MicroVMS 4.7 Installation on a MicroVAX II
This is a rough guide on installing VMS 4.7 into a MicroVAX II running an MFM Emulator and GoTek floppy Emulator.
Required Equipment
- MicroVAX II
- OpenSIMH v4.1 Simulator (Pre-built Simulator)
- GoTek Emulator
- MFM Emulator
- VMS 4.6 and VMS 4.7
- MicroVAX-II Diagnostics (MDM) (Source)
Overview
Installing VMS without installation tapes is very involved and requires several workarounds. The general steps are as follows:
- Create a VMS 4.7 Disk Image
- Setup the MFM Emulator
- Setup the Gotek
- Perform a low-level format of the MFM drive
- Setup a VMS Cluster
- Copy uVMS 4.7 to the MicroVAX
Key Terms & Concepts
Hardware Terms:
- KA630 - MicroVax II CPU
- RQDX3 - Disk & Floppy Controller (Up to 4 devices)
- DELQA - Ethernet Controller
- RX50 - Dual-diskette Drive (Floppy Drive)
- RX33 - Single Floppy Drive
- TK50 - Tape Drive
- RD51, RD52, RD53 - DEC MFM Drives (10MB, 30MB, 72MB)
Console Boot Devices:
- DUA0 - Fixed Disk or Floppy
- DUA1 - Fixed Disk or Floppy
- DUA2 - Fixed Disk or Floppy
- DUA3 - Fixed Disk or Floppy
- XQA0 - Network Interface 0
Create a VMS 4.7 Disk Image
Because no installation floppy disk images exist we have to install VMS from a tape image. However, no one has yet made a tape emulator, which means that we have to install VMS using Simh on a simulated machine and then copy that disk image to the MicroVAX.
When writing this page OpenSIMH 4.1 does not have an official release. However, you can download the latest automated build from the "Actions" tab on the GitHub page or the link above.
Install VMS on Simh
Download and extract VMS 4.6 and VMS 4.7 into a single directory with MicroVAX2.exe. Install VMS 4.6 by following this guide, but change the RQ0 to an RD53 and the disk file name to uVMS_4.7.RD5.

Next, upgrade to VMS V4.7, you can find the steps here under the section Upgrade to VMS V4.7. There is no need to install any of the cluster software.
For convenience here is an RD53 disc image with uVMS 4.7 already installed.
Username: SYSTEM
Password: microvax

Setup the MFM Emulator
Start by removing the old MFM drive if still installed and install the MFM Emulator.
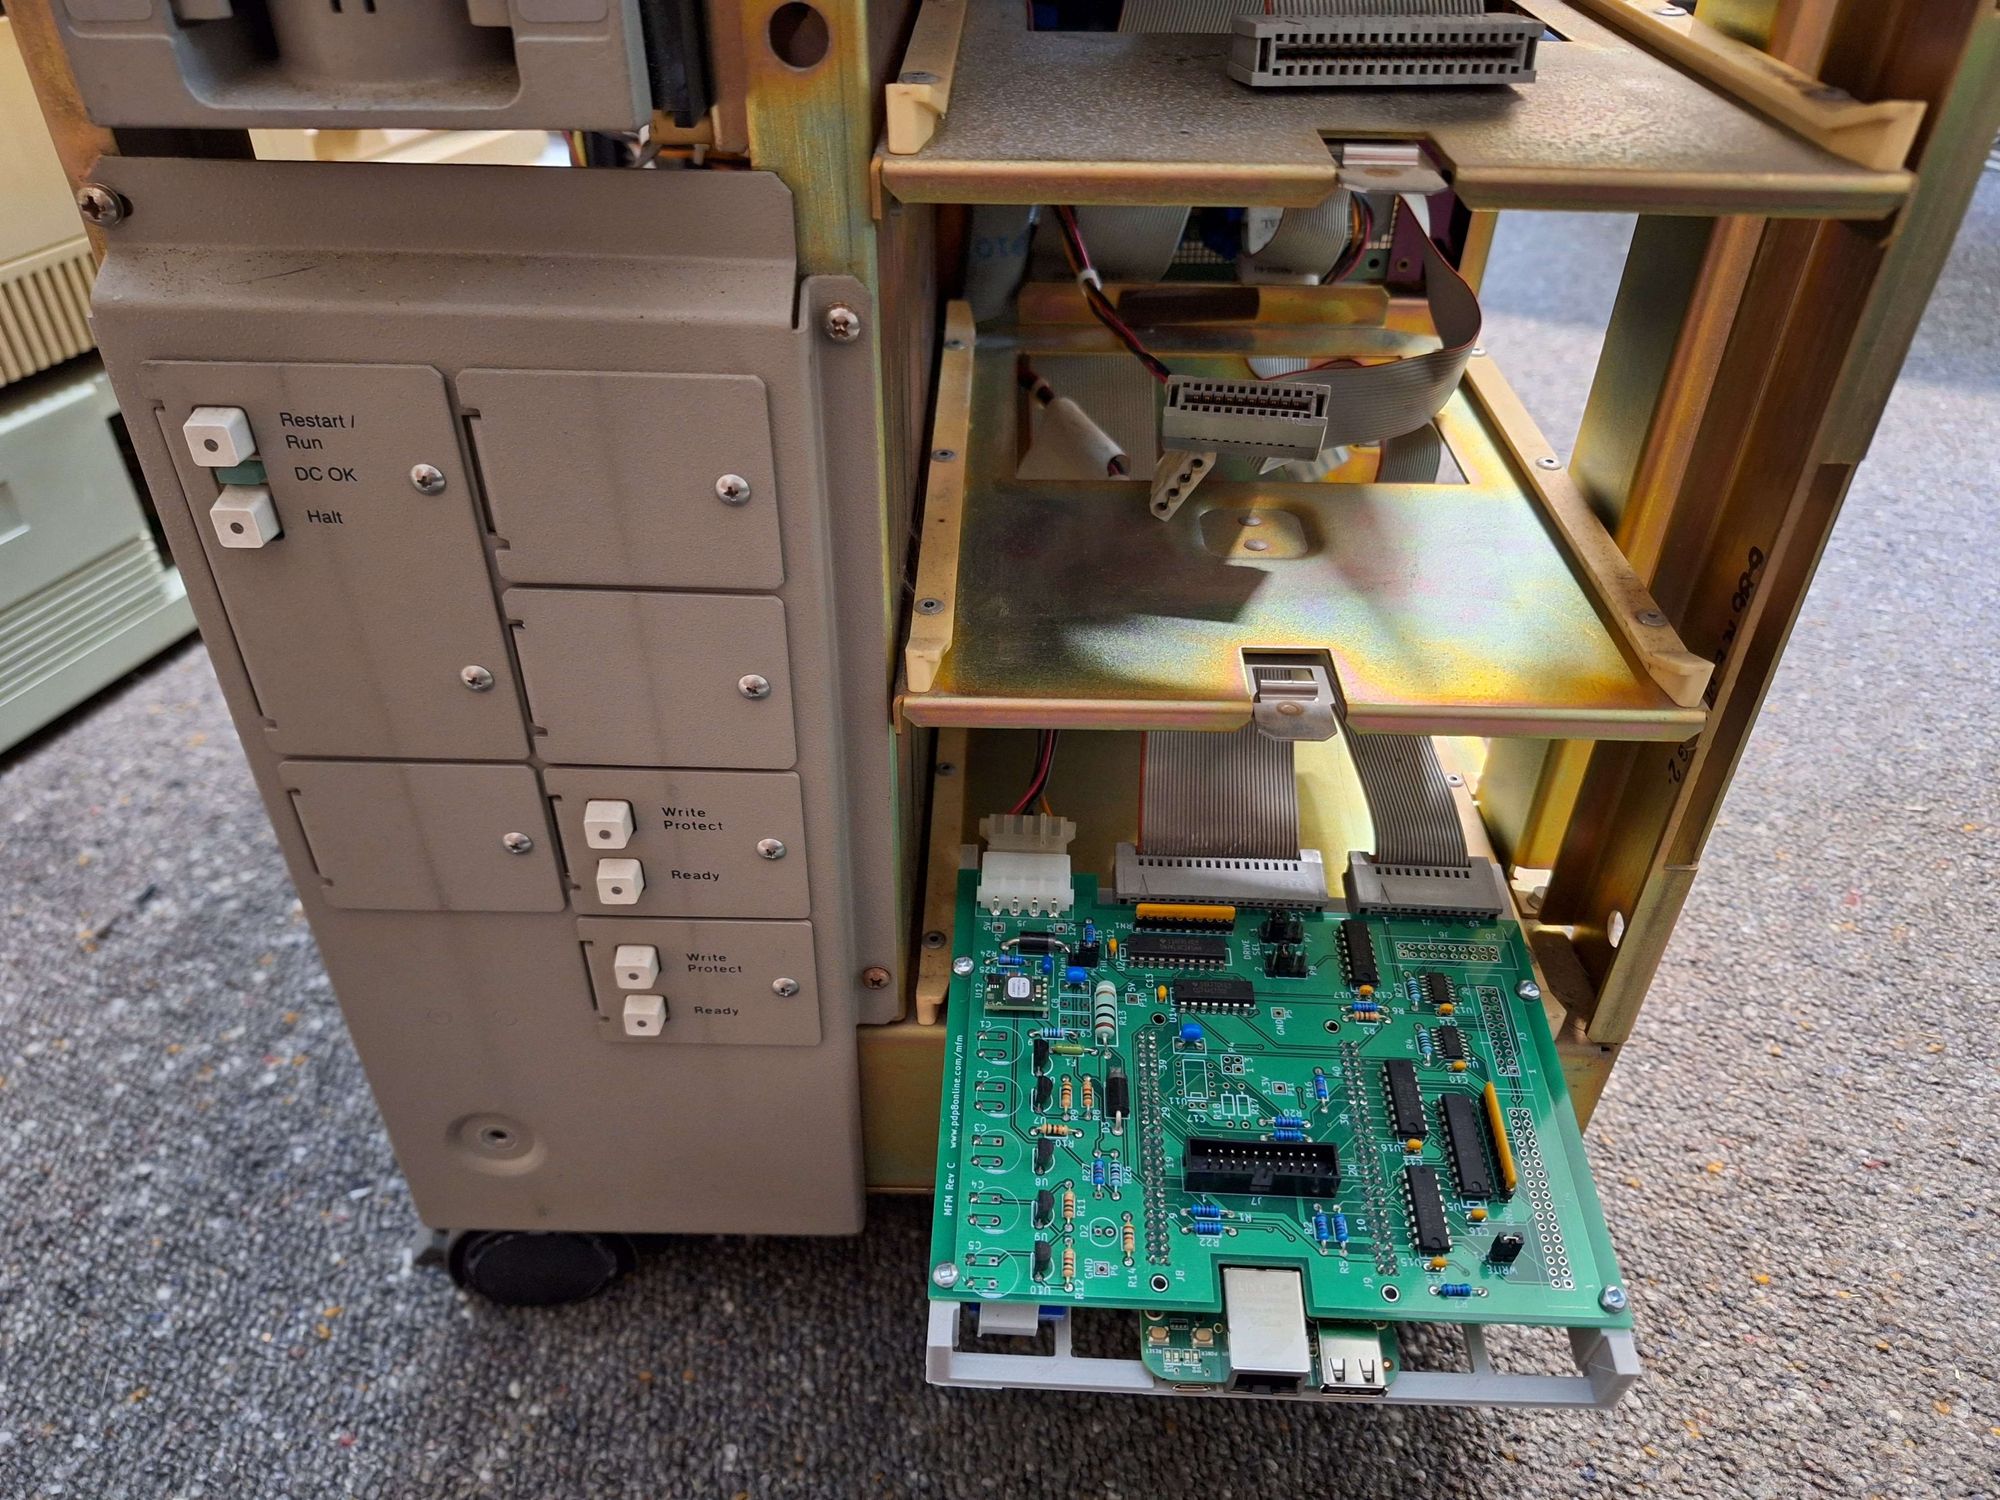
Power up the system and log into the Beaglebone. We will create a new drive that acts like the original RD53, the largest drive we can format (73 MB).
cd ~/emu
./mfm_emu --drive 1 --file ../uVMS47.emu --initialize --cylinders 1024 --heads 8
For now, leave the emulator running, next time you wish to start the emulator with the same image use this command:
./mfm_emu --drive 1 --file ../uVMS47.emu
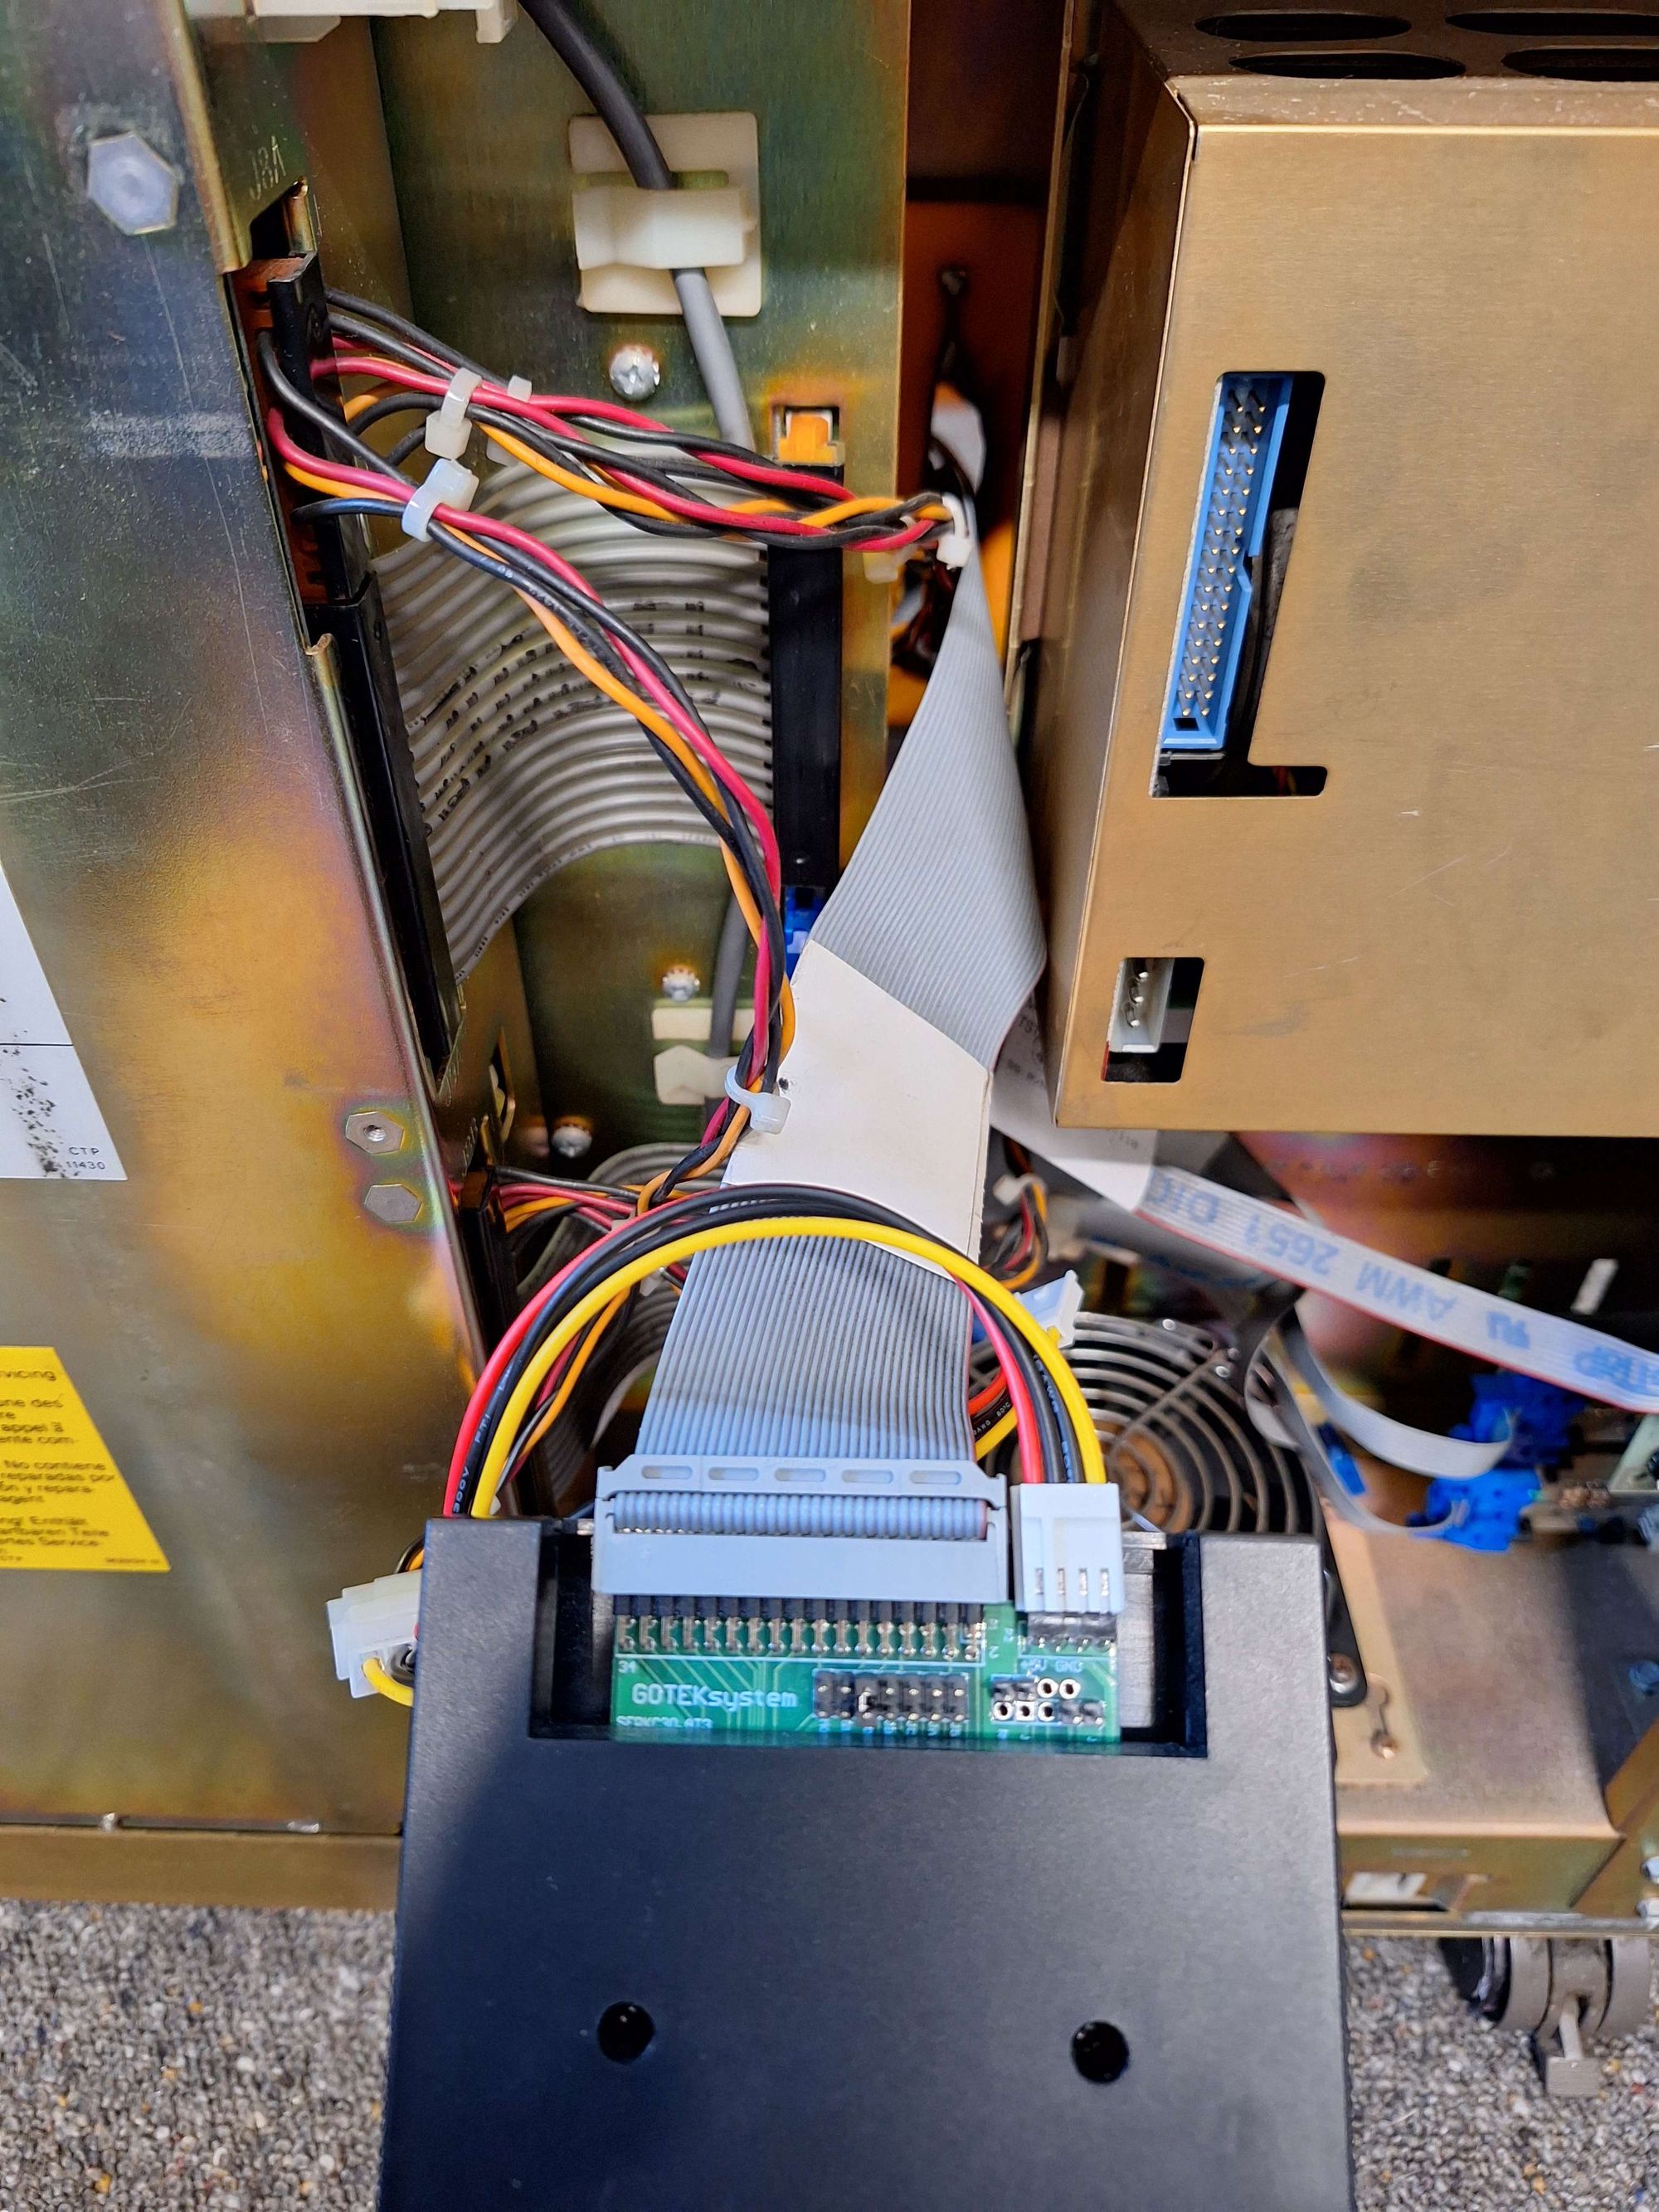
Setup the Gotek
Unplug the RX50 floppy drive and plug in the GoTek, ensure that the GoTek has a jumper in position S0 and that no other jumpers are installed. Edit the FF.CFG file and set interface=shugart and host=dec.
Perform a Low-level format of the MFM Drive
In this step, we will perform a low-level format of the MFM drive. We can do this with the MicroVAX-II Diagnostics (MDM) distributed on floppy disks.
However, there is a slight catch. The MDM floppy disk images that are commonly available are in a format understood by Simh but not by the GoTek, so first they must be converted.
Someone has made a little Python script to do the conversion, you can find it here, but if you don't want the hassle pre-converted files can be found below, simply copy them onto the GoTek.
Boot the MDM
Copy the MDM image to the GoTek and power on the system.
From the console to boot to the floppy drive enter this command b dua1
Follow the instructions from the MDM, inserting the next floppy as requested.
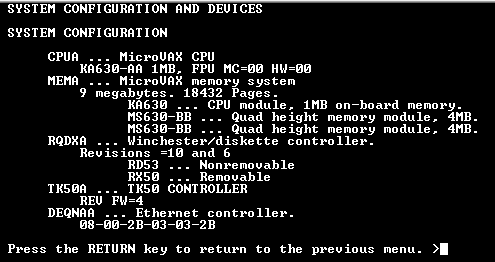
The first thing we will do is get the MAC address of the DELQA. Select option 2, Display System Configuration and Devices and record the Mac address.
Now we get to format the disk, the tool can be found under
Display the Service Menu >
Display the device menu >
RQDXA >
Display the device utilities menu >
Formatter for RD53, RD52 and RD51 Winchester
Use the default settings and format DUA0 (Drive 0). This may take a few minutes, once complete you can reset the system and return to the console.
Setup a VMS Cluster
The VMS Cluster will allow us to boot the MicroVAX over the network, it will also allow us to copy a network disk (our pre-made VMS4.7 image) onto the MFM emulator.
To set up the cluster follow this guide:
Once the cluster is set up add a new node for the MicroVAX, and use the MAC address we got from the MDM.
Shut down the cluster edit the microvax2.ini file, and set RQ1 to use the image file uVMS_4.7.RD53 that we made previously. Connect the MicroVAX to an Ethernet Port on the system running the cluster and start both the cluster and MicroVAX.
Copy uVMS 4.7 to the MicroVAX
We are now ready to install VMS into the MicroVAX. Start both the Cluster and MicroVAX.
Boot the MicroVAX from the Cluster
From the console run the command "b XQA0", this will instruct the MicroVAX to try boot from the cluster.
Copy VMS to the MicroVAX
The last step is to copy the uVMS_4.7.RD53 disk image into the MicroVAX, which can be done with these commands.
MOUNT/NOASSIST EARL$DUA1: MICROVMS
MOUNT/FOREIGN MICRO$DUA0:
BACKUP/IMAGE/IGNORE=INTERLOCK EARL$DUA1:  MICRO$DUA0:
If everything went correctly you will now be able to boot from the MFM Emulator, reset the system and run the command "b dua0".
Congratulations
Congratulations you have installed MicroVMS 4.7 onto a real MicroVAX II.
For convenience here is a copy of the MFM emulator file with MicroVMS 4.7. The username is SYSTEM and the password is microvax.
Everything below is a previous attempt
The above technique works better
Create Floppy Installation Media
As far as I am aware a tape emulator suitable for the MicroVAX does not exist which makes installing VMS a little more challenging. Fortunately, there is the GoTek floppy emulator which is supported by the RQDX3.
As far as I can tell VMS 4.6/4.7 was never distributed on floppy disks this is a slight flaw in our plan of using the GoTek. Fortunately, VMS's backup utility can backup to floppy disks. In the following sections, we will install VMS 4.7 onto the SIMH MicroVAX II Simulator and then create a Bootable Standalone Backup and Backup Set.
2. Create a Bootable Standalone Backup
In this step, we will create a set of bootable floppy disk images that contain a backup utility that will allow us to restore a backup to our MFM disk.
Pre-made images can be found here.
If you wish to make the images yourself start the MicroVAX II Simulator using the following ini file:
SET CPU 4M
SET CPU CONHALT

SET CONSOLE LOG=INSTALL.LOG

SET RQ0 ENA
SET RQ0 RD54
ATT RQ0 uVMS046.R54

SET RQ1 ENA
SET RQ1 RX33
;ATT RQ1

SET RQ3 DIS

SET TQ0 DIS
SET TQ1 DIS
SET TQ2 DIS
SET TQ3 DIS

SET LPT DIS
SET RL  DIS
SET TS DIS

SET XQ DIS
;SET XQ  TYPE=DEQNA

; Auto-Boot VMS
EXPECT ">>> " SEND "BOOT\r"; GO -Q

BOOT
Boot to VMS using the command "B DUA0", once in VMS, run the following command and attach new floppy images when prompted.
$@sys$update:stabackit
Press Ctrl+e to halt the simulation, and attach a new disk with the following commands:
Ctrl+e
ATT RQ1 DSKAxxxx.IMG
c
3. Create Backup-Set
Next, we need to create a backup set of the system disk. Again pre-made images are available here. Making the backup set is much like making the bootable floppies except instead of 3 disks it takes almost 20.
With VMS running attach a new disk to RQ1 (ATT RQ1 DSKA0004.IMG). Next, we need to format and mount the first disk of the backup-set, using the following commands:
$INIT DUA1: BACKUP
$MOUNT/FOREIGN DUA1: BACKUP
With the first floppy mounted, we can start the backup. We will be automatically prompted when we need to change to the next floppy. Like we have done before pause the simulation, attach the next disk, and continue the simulation.
Run the following command to start the backup, note that each time you are prompted to confirm you need to swap floppy, this includes the first prompt.
$BACKUP/IMAGE DUA0: DUA1:SAVE_SET.BCK /SAVE_SET
After the completion of the backup stop and exit the simulation to close the file of the last floppy.
Restoring VMS From The Backup
Load the newly created Bootable Standalone Backup and Backup Set onto the GoTek and boot from the Bootable Standalone Backup.
Once the system has booted we can run the backup command to restore the Backup Set to the MFM drive, effectively installing VMS. Change to the first backup floppy disk and run the following command:
$BACKUP/IMAGE DUA1:SAVE_SET.BCK/SAVE_SET DUA0:
When prompted swap to the next floppy image. If you are using SIMH halt the simulation with Ctrl+e and attach the next disc ATT RQ1 DSKAxxxx.IMG then resume the simulation with the c command.
After restoring all the backup disks you can reboot the system and boot from DUA0 with the command "B DUA0".
Comments